Dianna van Gaal - Step by Step Planting Guide for Irises.

Iris Flowers
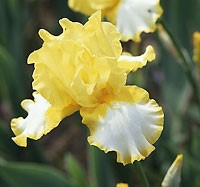
Iris flowers have three primary structures, and descriptions of a variety often refer to these parts. For example, in the flower 'Fringe of Gold' below, the drooping "falls" are white edged (or picoteed) in yellow. The upright "standards" are solid yellow. And the tiny fuzzy "beard" in the middle is white.
Iris flowers have three primary structures, and descriptions of a variety often refer to these parts. For example, in the flower 'Fringe of Gold' below, the drooping "falls" are white edged (or picoteed) in yellow. The upright "standards" are solid yellow. And the tiny fuzzy "beard" in the middle is white.
NB: Gardener’s good practice: Always wear gloves, cover arms and wash hands.
Planting - Step by Step
Bearded irises should be divided after flowering in the late summer, when the weather starts to cool. Divide every three years to prevent overcrowding.
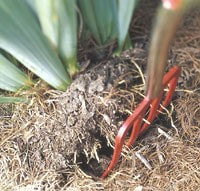
1. Carefully dig the clumps with a garden fork or spade, taking care not to chop into the rhizomes more than necessary. Lift the plant out of the soil and with your hands underneath the soil clump shake vigorously. With the soil shaken off the roots, rhizomes and offsets will become clearly visible.
Bearded irises should be divided after flowering in the late summer, when the weather starts to cool. Divide every three years to prevent overcrowding.
1. Carefully dig the clumps with a garden fork or spade, taking care not to chop into the rhizomes more than necessary. Lift the plant out of the soil and with your hands underneath the soil clump shake vigorously. With the soil shaken off the roots, rhizomes and offsets will become clearly visible.
2. Divide the rhizomes by pulling them apart with your hands. In some cases, you may need to use a sharp knife to separate the baby rhizomes from their mothers. If so, dip your knife into a 10-percent bleach/water solution between cuts. A good rhizome will be about as thick as your thumb, have healthy roots, and have one or two leaf fans.
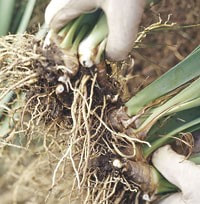
3. Wash the soil off the rhizomes so that you can inspect each one for iris borer (a fat, white worm). If you find a borer, destroy it. Some gardeners like to wash their iris rhizomes in a 10-percent bleach solution to protect against disease, but that won't help plants that are already rotting. Discard any rhizomes that feel lightweight or hollow, and appear dead.
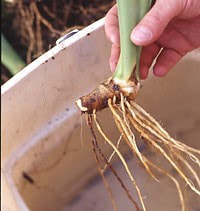
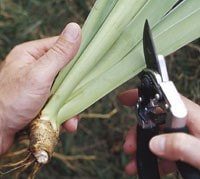
4. Clip off the leaf blades so that they are 10 cm to 15 cm long. This reduces the stress that the plant goes through as it concentrates on re-growing new roots instead of trying to maintain long leaves.
5. Replant divisions, setting the rhizome higher in the planting hole than the fine roots, which should be fanned out. Cover the rhizome with soil right up to the leaves and water in. Water again every second day for two weeks. A bit of the top surface of the rhizome should be just visible at the soil surface.

6. Space the plants 30 cm to 50 cm apart (less space for median irises). Achieve a massed effect quickly by planting 3 to 6 plants of the same variety in close proximity. For the best display, plant the rhizomes so the fan of leaves face the same direction. Using an upturned bucket, press a round shape outline in the soil. With either three or 5 rhizomes plant the rhizomes with toes (or pointy end of the rhizome) pointing inwards, inside the circle. Do not mulch over the rhizomes as this could cause rot.
Fertiliser
Dinofert - fertiliser is a generic brand similar to Dynamic Lifter. It comes in bags of small pellets and we spread that on our garden beds during winter.
We also mix it into the soil before we replant rhizomes which have been dug and divided. When we first established our garden we bought premium grade vegetable mix soil from Hothams in Bathurst. If you have access to cow, sheep or chicken manure it is also good for mixing with old soil in garden beds before planting.
Weed Control
Salvo 212 - Herbicide manufactured by Apparent (Generic form of Fusilade*)
*Fusilade II Herbicide Broad-Spectrum Grass Control in a Variety of Situations. Fusilade ® II herbicide is a selective post emergent turf and ornamental herbicide that controls a long list of both perennial and annual grass weeds in a variety of turf and landscape areas. Extremely fast and effective, Fusilade II can be applied over-the-top or as a directed spray without damaging shrubs and flowering plants. It is a post-emergent so it is most effective when applied to early growth of weeds.
| step_by_step_planting_guide.pdf |
